
How to Keep Characters Consistent Across AI Book Illustrations
A picture-book character needs to remain recognisably the same character throughout a story, whether running, hiding, laughing or looking back over a shoulder. A convincing first illustration is only the beginning; the real challenge is carrying that identity through the whole story without freezing the character into the same pose on every page.
A useful approach is to treat the prompt as an illustration brief: it explains who belongs in the picture, what the scene must communicate and which visual decisions should remain stable. The same planning principles are useful whether you work directly with an AI image engine or use a book-production tool such as Limnforge. The controls available will vary, but the creative questions remain much the same.
Start with suitability. A beautiful image may still be wrong for the reader’s age, the story’s emotional tone or the page it must fit. Decide what the reader should notice first, how the picture advances the story and where the words will sit. Then build the prompt around those decisions.
Here’s a structured approach that can be followed to greatly improve character consistency:
1. Define the features that make this character recognisable
Before attempting to illustrate the written manuscript, write a short visual description of the character. Include the features you would use to recognise them from a different angle: face shape, hair or fur, proportions, distinctive markings, clothing and recurring accessories. Record only details you have actually chosen.
Keep temporary states separate. “Worried, crouching beside the doorway” describes this moment; it does not belong in the character’s permanent identity. Maintain a reusable character description, then add the expression and action for each unique scene. Use the same names and descriptive terms throughout your working notes so that you can spot accidental changes.
This separation makes later instructions clearer. A new page can change what the character is doing without inviting a new costume, different markings or a different face.
2. Approve references before building a whole book around them
Choose a clear, approved image of the identity you want to keep. Review it carefully before using it repeatedly. An attractive image with the wrong proportions is a poor foundation for consistency. A complementary view can help document features hidden in the first image, but it should show the same design. Resolve disagreements in clothing, markings or face shape before treating a set of references as approved.
Where your image engine accepts references, attach the relevant images and explain their roles: character identity, visual style, setting or composition. A filename mentioned in the prompt does not attach the image. Be explicit about which features should carry forward and which should change. This separation of reference roles and preserved features is also reflected in OpenAI’s image-prompting guidance.
3. Keep character identity and illustration style distinct
Character references answer “Who is this?”, whereas style references answer questions about line, colour, brushwork, texture and overall finish. Both matter, but a consistent painting style alone does not establish a consistent character.
Set the book’s visual direction deliberately: medium, line treatment, palette, level of detail and the way surfaces are rendered. Keep a separate record of the world’s recurring facts, such as a house’s layout or a vehicle’s design. Use approved style references that agree with that direction, since adding several appealing but incompatible images can leave the intended look unclear.
When reviewing a result, check identity and style separately. The face may be correct while the rendering feels too glossy for the surrounding pages; the brushwork may be right while the character’s proportions have drifted.
4. Write a brief that describes a visible result
For each page or spread, describe the story beat, the characters present, what each is doing and feeling, and the important props. Add the location, composition and intended space for text. Keep those scene decisions consistent with the approved character and world descriptions/references.
Translate abstract intentions into visible choices. “She is determined” leaves much open to interpretation. “She leans forward, grips the handle with both hands and looks towards the gate” gives you an action to assess. Choose gestures that suit your character and audience rather than packing several competing emotions into one instruction.
Give each part of a complex brief a clear job. A practical order is purpose and format; character identity and references; scene and action; composition; style and light; then important constraints. Readable sections make revisions easier. OpenAI’s prompting cookbook recommends clear structure, concrete visual details and explicit constraints, rather than relying on a particular prompt syntax.
Describe what belongs in a reserved area for text placement. “A broad area of softly lit sky above the character for the heading” is easier to review than “leave some space”. Specify what must stay clear of it, such as branches or faces. Plan for the actual words and your intended page shape; select a suitable aspect ratio in the engine’s controls where available, rather than relying on prose alone.
Before sending a prompt, remove any contradictions. “Tight close-up” and “show the entire body and surrounding landscape” ask for different compositions. Decide which serves the story best - keeping exclusions focused on meaningful errors, such as an unwanted extra character or a prop that belongs in a later scene.
A worked prompt example
“A cute rabbit in a beautiful forest, consistent with the other pictures” leaves the character design, action, framing and page purpose largely unspecified. For this worked example, I created a character reference and a separate woodland style reference in OpenAI’s image interface, then attached both when generating the scene.
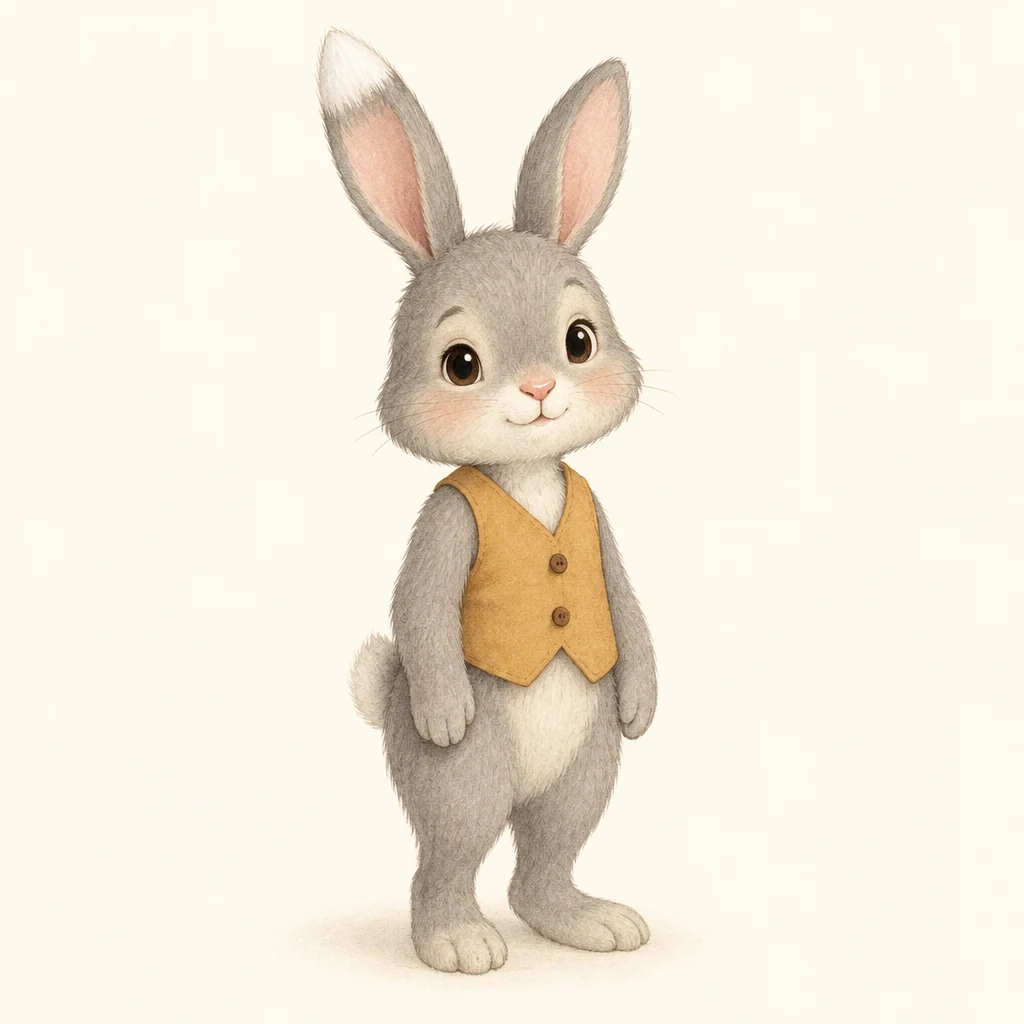
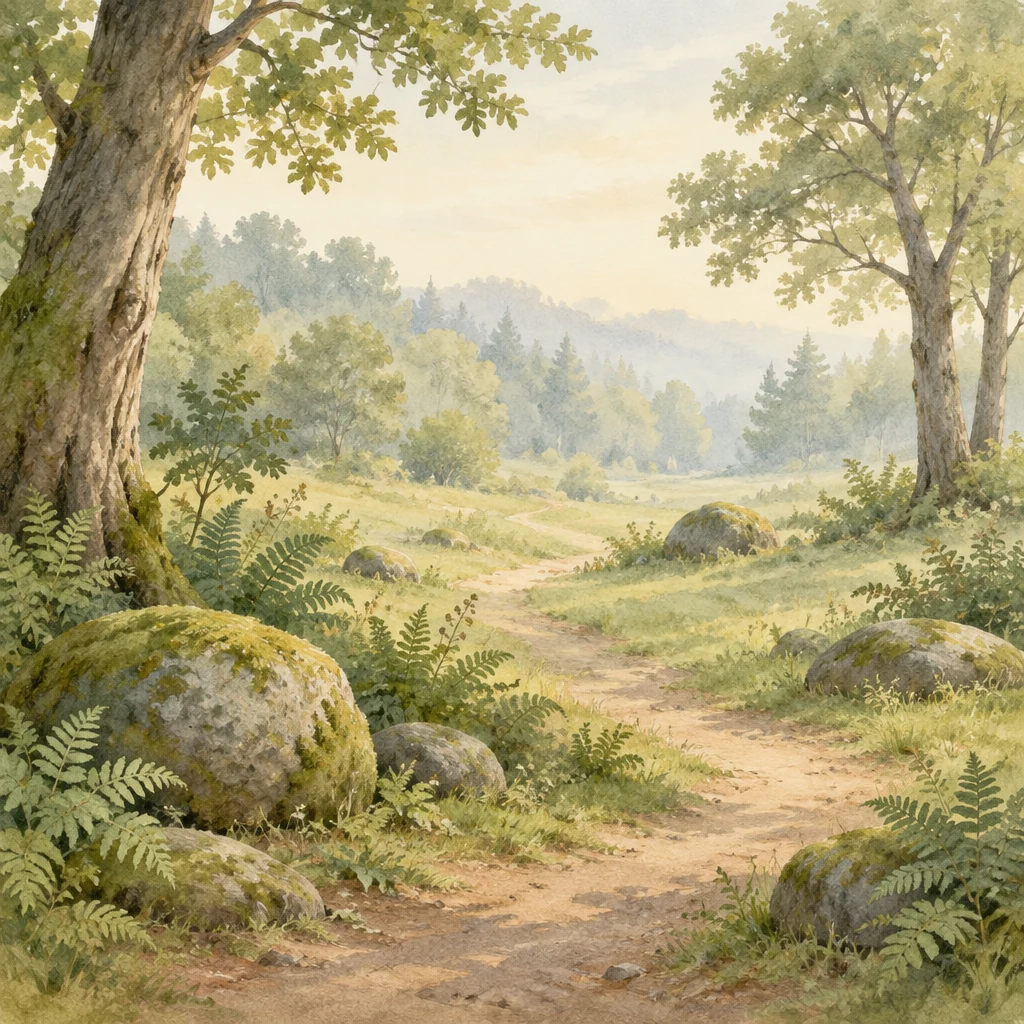
The scene prompt assigns a different role to each attached image: Reference A establishes who Nessa is; Reference B establishes how her world is painted.
Click to read the full scene prompt
Create a square picture-book illustration for children aged four to seven, using the two attached reference images.

REFERENCE ROLES
Reference A is the character identity reference for Nessa. Preserve her face shape, body proportions, grey fur, cream muzzle, round cheeks, dark-brown eyes, pink nose and distinctive ear marking: her right ear has a white tip and her left ear has a grey tip.

Preserve her plain ochre waistcoat with two small brown buttons. Do not add clothing or accessories.

Reference B is the visual-style reference. Follow its watercolour treatment, delicate pencil accents, restrained woodland palette, gentle morning light and softly painted environmental forms. Create the new composition described below rather than copying its layout.

STORY MOMENT
Nessa has noticed a single red leaf floating in a shallow forest stream. This is a quiet moment of discovery, with curiosity and warmth rather than surprise or danger.

ACTION AND EXPRESSION
Nessa kneels on the grassy bank beside the stream. Her forepaws rest on her knees. She leans slightly forward and looks directly at the floating leaf with a softly interested expression.

Keep her face readable in three-quarter view and her identifying ear marking visible. Adapt her pose naturally while retaining the character design from Reference A.

COMPOSITION
Use an eye-level, medium-wide view. Place Nessa in the lower-right portion of the square image. Show her complete figure, including her ears and feet.

Place the red leaf in the water below and slightly to the left of Nessa, within the lower-right half of the image. Make the leaf easy to distinguish from the water and stones. Her gaze should connect clearly with it.

Let the shallow stream curve through the lower portion of the scene. Include a few rounded stones, small plants and softly suggested woodland beyond.

SPACE FOR NARRATION
Reserve a broad, pale area in the upper-left portion for narration to be added later. Paint this as a natural opening of softly lit sky above distant, low woodland.

Keep branches, strong outlines, dark foliage and other high-contrast details outside this reserved area. It should feel like part of the landscape, not a blank panel or white rectangle.

STYLE AND CONSTRAINTS
Follow Reference B’s gentle watercolour finish and muted colours. Let the single red leaf provide a small, clear colour accent.

Nessa is the only character present. Include no additional animals, duplicate rabbits, extra floating leaves or invented accessories.

Produce artwork only. Do not add narration, lettering, speech bubbles, labels, borders or watermarks.
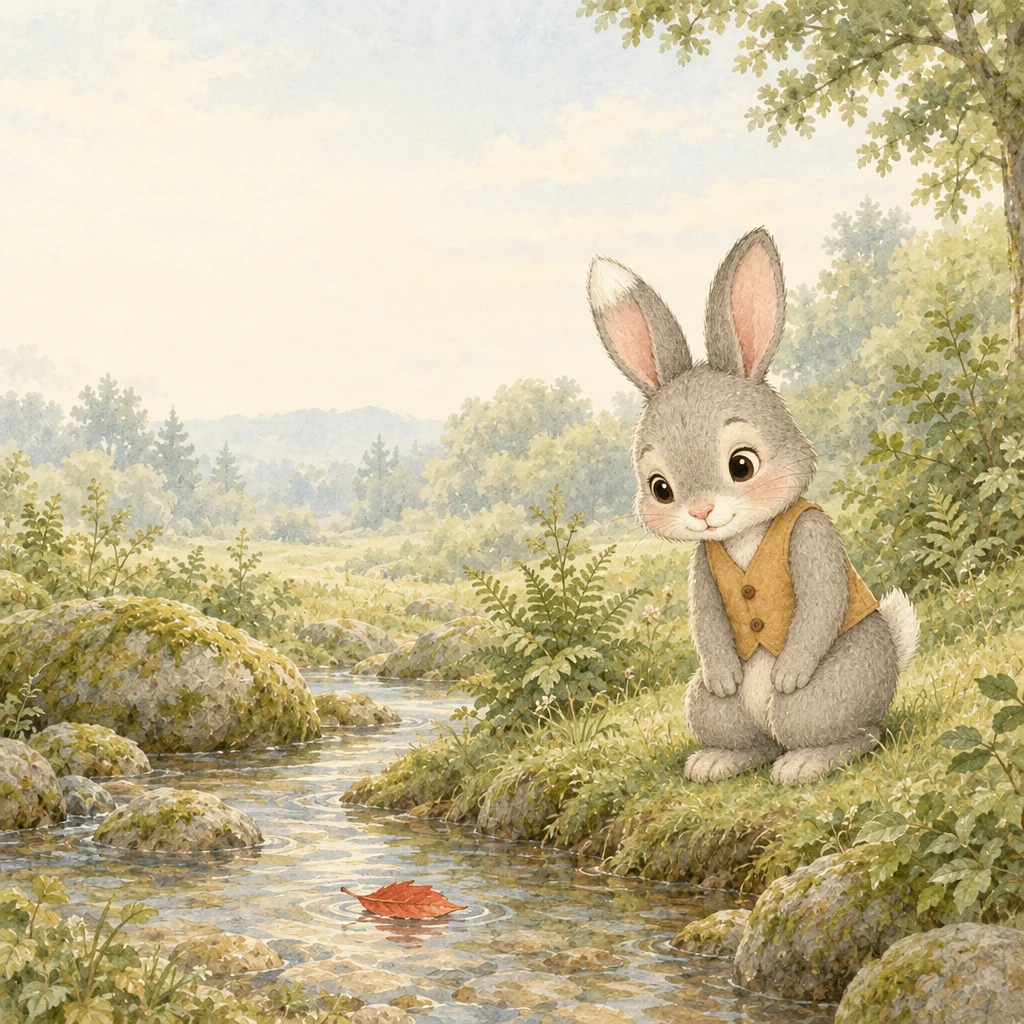
The result carries through Nessa’s distinctive ear marking, face and waistcoat, alongside the woodland palette and watercolour treatment. It also leaves a pale upper-left area for narration. It does not follow every scene instruction exactly: her gaze appears directed slightly towards the viewer rather than clearly at the leaf, and the leaf sits left of centre rather than in the requested lower-right half. There is also slight patterning evident on some surfaces. These are useful reminders to check the story action and composition as well as character identity and style. These details can be fixed with small refinements specific to each issue, before approving the image and moving on.
For the next illustration, retain the approved identity and style information while changing the scene and composition. Review any carried-over instruction: a kneeling pose or morning light may be wrong for the next story beat. Reuse the decisions that still apply, not the entire previous scene by habit.
Consistency should leave room for storytelling
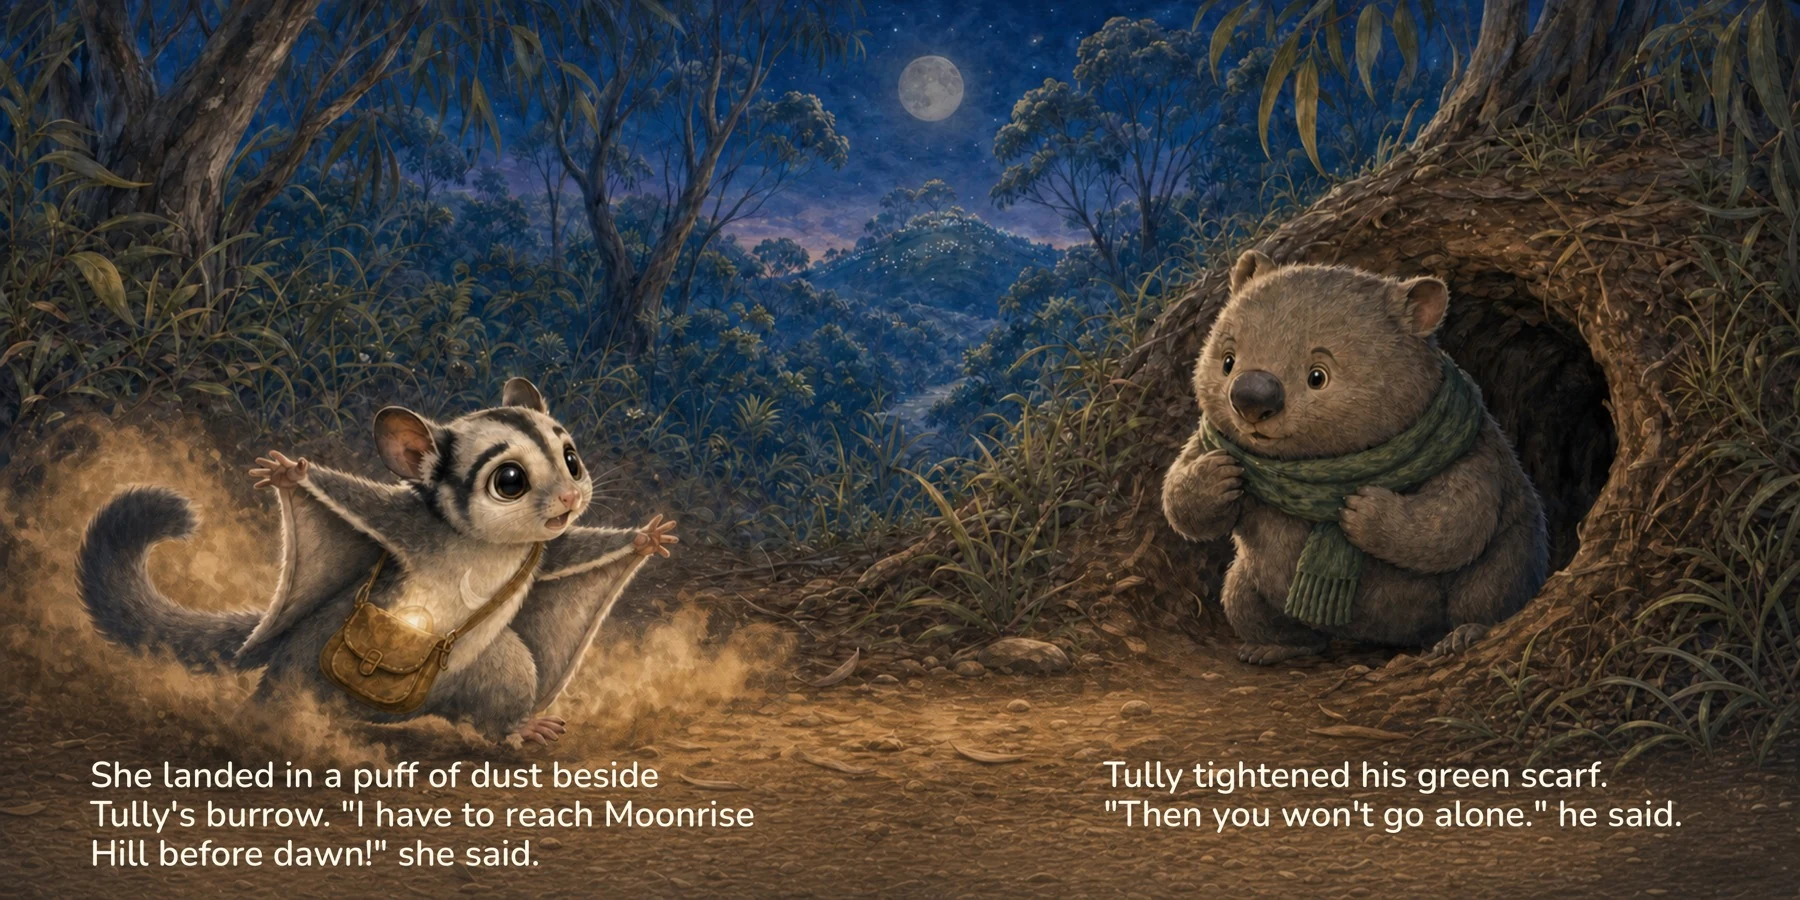
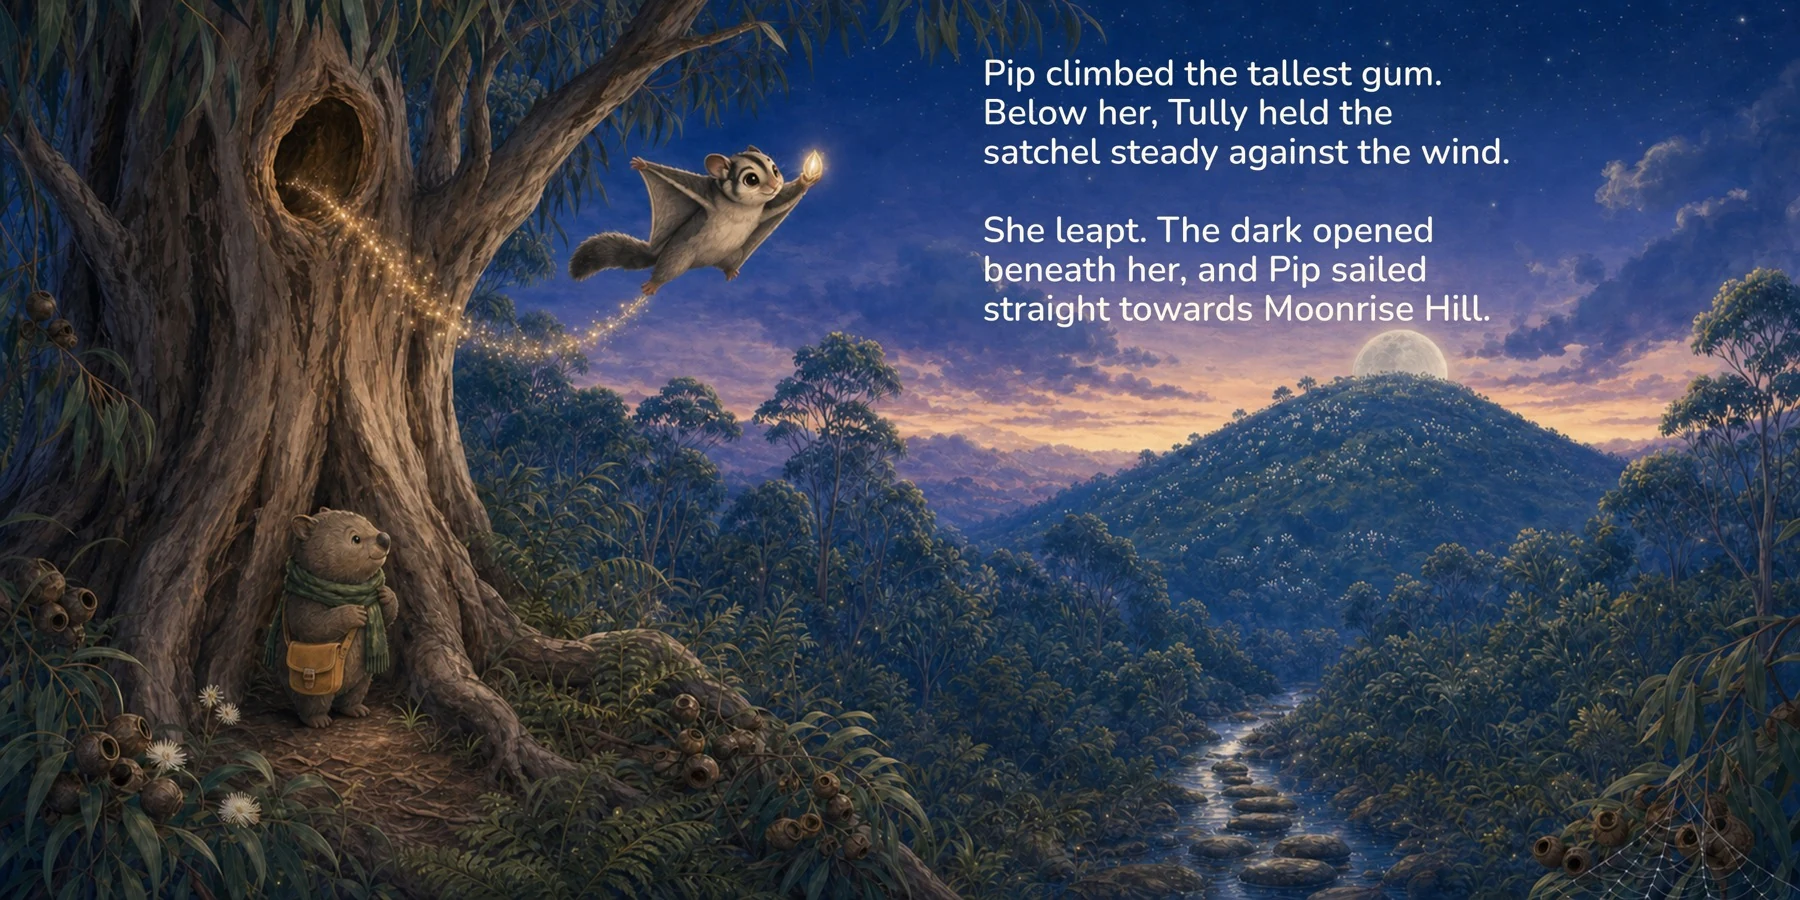
The existing Pip and the Moonseed showcase on the Limnforge website offers a useful example of the changing demands within one story: Pip arrives beside Tully’s burrow, the pair examine a glowing seed, and Pip glides above the forest. Those scenes need different poses and framing. The review question is whether the character still reads as Pip through those changes.
5. Revise deliberately and keep a record
Decide whether you need a correction to the current picture or a new composition. If the illustration works apart from an accessory, give a focused correction and identify the accepted details to retain. If the story calls for a different location and action, write a new scene brief and bring forward the appropriate identity and world references.
Save the prompt, selected references and relevant settings alongside each approved result. When investigating a problem, change one meaningful element at a time where practical; otherwise it becomes harder to tell which revision helped. Compare the whole returned image, because a requested correction may affect other details too. Small, explicit revisions and a distinction between what changes and what stays fixed are central to OpenAI’s editing guidance.
6. Review the sequence, not just individual favourites
Before approving a new illustration, compare it with the character references and other approved pages. Check:
- Identity: face, proportions, hair or fur, markings and costume.
- Relationships: relative character sizes and the scale of recurring props.
- Story: the intended action, expression and cast for this scene.
- World and style: recurring locations, visual treatment and palette.
- Page design: room for the actual text, clear focal points and a readable composition.
Also review the pages together. A small drift that is easy to overlook in a single image can become obvious across a sequence. If a result is unsuitable, correct it before treating it as the reference for more pages. Keep returning to approved decisions rather than allowing each new generation to redefine the character.
7. How Limnforge brings the brief together in one platform
All of these decisions become substantial across a whole book. Limnforge gives them separate, reusable homes and compiles them into comprehensive image-generation instructions. You do not have to manually repeat the entire book brief in every scene description.
Character Studio holds stable Visual Descriptions and approved Primary and Secondary References, with expression and pose treated separately. Spread-specific supporting-character library selections let you choose the references needed for one scene without replacing those on other spreads. Book Style DNA describes the rendering approach, while the World Module records recurring setting rules.
Illustration Instructions and Spread Planning supply the target scene, cast, props, environment, composition and text-area requirements. The compiled prompt brings the relevant information together with the selected page or spread format and applicable reference guidance. Relevant continuity or refinement instructions are included according to the chosen workflow.
For an existing picture, use Current Illustration Refinement and its Correction Brief. For a new scene inheriting details from an approved illustration, use Previous Illustration Continuity and select an appropriate anchor. Keep the new scene in Illustration Instructions and additional inheritance direction in the optional Continuity Brief. These are separate paths; the best continuity anchor is the approved image that shows the information you need, not necessarily the previous page.
Develop your planning with Co-Pilot and your chosen AI agent
You do not have to work out every planning field on your own. Limnforge’s Co-Pilot feature provides copyable Work Orders: structured starting prompts that bring relevant project context into a conversation with your chosen AI agent. You can use that conversation to clarify what you want the illustration to achieve and turn your ideas into organised planning inputs.
That shared book context is central to maintaining character and world consistency. Each work order automatically includes the relevant information already established for its task, drawing on your saved character descriptions, World Module, Book Style DNA, Book Format and applicable manuscript and page-planning details. Your chosen AI agent can build on the book’s recurring rules and approved identities as it helps plan each new illustration. The more fully you develop that project information, the stronger the foundation for consistent suggestions.
Character Studio and approved Style References provide the visual foundation alongside those written decisions. Reference images need to be attached separately when your external AI agent must examine them; within Limnforge, the selected character and style references support image generation. Together, reusable book context, structured planning and visual references help carry the same characters, world and artistic direction across the book, while allowing each scene to tell a different part of the story.
For page or spread planning, the process is straightforward:
- Select the page or spread in Limnforge and choose Work Order 7 — Spread Planning and Illustration Instructions.
- Select Copy Work Order and paste the complete work order into your chosen AI agent’s chat. Answer any questions it raises about your intentions, such as the desired action, mood, composition or space for text. The supplied context helps it build on decisions you have already made.
- Review its response and discuss any changes. The work order asks the agent to return copy-ready text under headings that match Limnforge’s Illustration Instructions and Spread Planning fields.
- Copy the approved values into their corresponding Illustration Instructions and Spread Planning fields in Limnforge, apply any relevant selector choices, and save the plan. Keep explanatory advice separate from the field text.
This gives you a practical bridge from a creative conversation to a structured illustration brief. You remain in control of the decisions and what is pasted back into the app. If the agent needs to assess a reference image, attach it separately: copying a work order carries text, not the image itself. Once the planning inputs are in place, Limnforge uses them when assembling the image-generation prompt.
Preview the compiled prompt before generating
Open your project, select the relevant page or spread and expand Compiled Prompt. You can read the assembled instructions, see character and reference counts, and use Copy to inspect the text elsewhere. Check whether the cast, scene, style, format and text reservations express what you intended. If a detail is wrong, correct its source field and review the refreshed preview.
Copying prompt text does not attach the reference images. If you use it in another AI tool, supply the required images (it’s easy to save any page or spread image directly from Limnforge to your hard drive) and check that tool’s supported controls separately. When current refinement is enabled, the preview explains the appropriate refinement action: the main Generate/Regenerate buttons create new artwork without those current-image correction instructions.
A comprehensive prompt is useful because it carries the relevant decisions together. It cannot repair contradictory source information or guarantee that an image engine will follow every instruction. The preview gives you an opportunity to catch those problems before generation; reviewing the actual artwork remains essential.
What else can Co-Pilot help you develop?
Limnforge Co-Pilot can help with decisions throughout the development of your book - from discovering your characters and shaping their world to planning individual illustrations and designing the covers. Its work orders help you explore these choices fully, using the relevant information already saved in your Limnforge project.
The descriptions below follow the full list of Work Orders available:
- Develop your main character — Explore who they are, their role in the story and the distinctive physical features that will make them recognisable throughout the book.
- Build the world your story lives in — Establish recurring places, environmental details, atmosphere and rules about what belongs in your setting, so each illustration feels part of the same world.
- Find the visual style for your book — Define the artistic treatment, colours, textures and overall mood, then prepare a first style reference to guide the illustrations that follow.
- Plan your character’s first reference images — Choose useful poses, expressions and views that establish how your character looks and provide a visual foundation for future scenes.
- Shape your story into a complete manuscript — Develop the narrative, pacing and page turns, fitting the story to the pages and spreads available in your chosen book format.
- Develop the supporting cast — Identify recurring characters who need a consistent appearance, and define their roles and visual identities.
- Plan what happens in each illustration — Work out the action, expressions, setting, props and composition for a page, spread or panel, including suitable space for the words.
- Add a character reference when the story needs one — Decide whether an unfamiliar pose or viewpoint needs an additional reference, and plan an image that fills that gap without redesigning the character.
- Improve an illustration you already have — Describe a specific correction while protecting the parts of the image you want to keep.
- Carry established visual details into a new scene — Use an approved illustration to help preserve character appearance, setting and style while planning a different action or composition.
- Create a front cover that communicates your story — Plan a clear, appealing focal image that conveys the book’s character and mood, leaves room for the title and works at a small thumbnail size.
- Write a back-cover description that invites readers in — Develop a concise, engaging blurb that introduces the story’s appeal without giving away its resolution.
- Plan a back cover that belongs with the front — Carry the established cover style through to a complementary composition, with suitable space for the approved blurb and other cover text.
As your book develops, the saved character descriptions, world rules, style choices and planning decisions give subsequent work orders a richer foundation—helping you build on what you have already established.
Consistent AI book illustration is an ongoing process of choosing, comparing and refining. Clear references and structured planning make that process easier to manage; your editorial judgement determines which images belong in the finished book.
Explore the workflow: see more on how Limnforge brings book planning and illustration together, or request the free Guide Pack for a closer look at the app.